Administration
Keycloak integration
Cerebrate can be used in standalone mode, where it authenticates and manages its own users. This happens to be also the default configuration after installation, but you are not limited to leaving Cerebrate in this mode of operation.
By enabling Keycloak as your authentication provider, you can rely on Keycloak for authentications, whilst still benefiting from all the user management offered by Cerebrate.
This will lead to Cerebrate pushing changes to Keycloak and maintaining the state of your users.
flowchart LR
    C[Cerebrate] -->|Push data| K[Keycloak]
    K -.->|Provide SSO| BBB[BigBlueButton]
    K -.->|Provide SSO| MM[Mattermost]
K -.->|Provide SSO| C- Users are created in Cerebrate and then automatically provisioned in Keycloak
- Other services (including Cerebrate) can rely on keycloak for authentication purposes
- Cerebrate is the user management interface to create users and revoke their access
- Keycloak should not be access directly
- User permissions for other tools are managed via permission flags encoded as User Meta-fields in Cerebrate
- Manage the available permissions
Keycloak configuration
- As a first step, create a Realm with OpenID endpoint configuration
- The realm's name is to be used by all other tools relying on Cerebrate's user management
- The Name field will need to be reflected in Cerebrate as the Realm Name

-
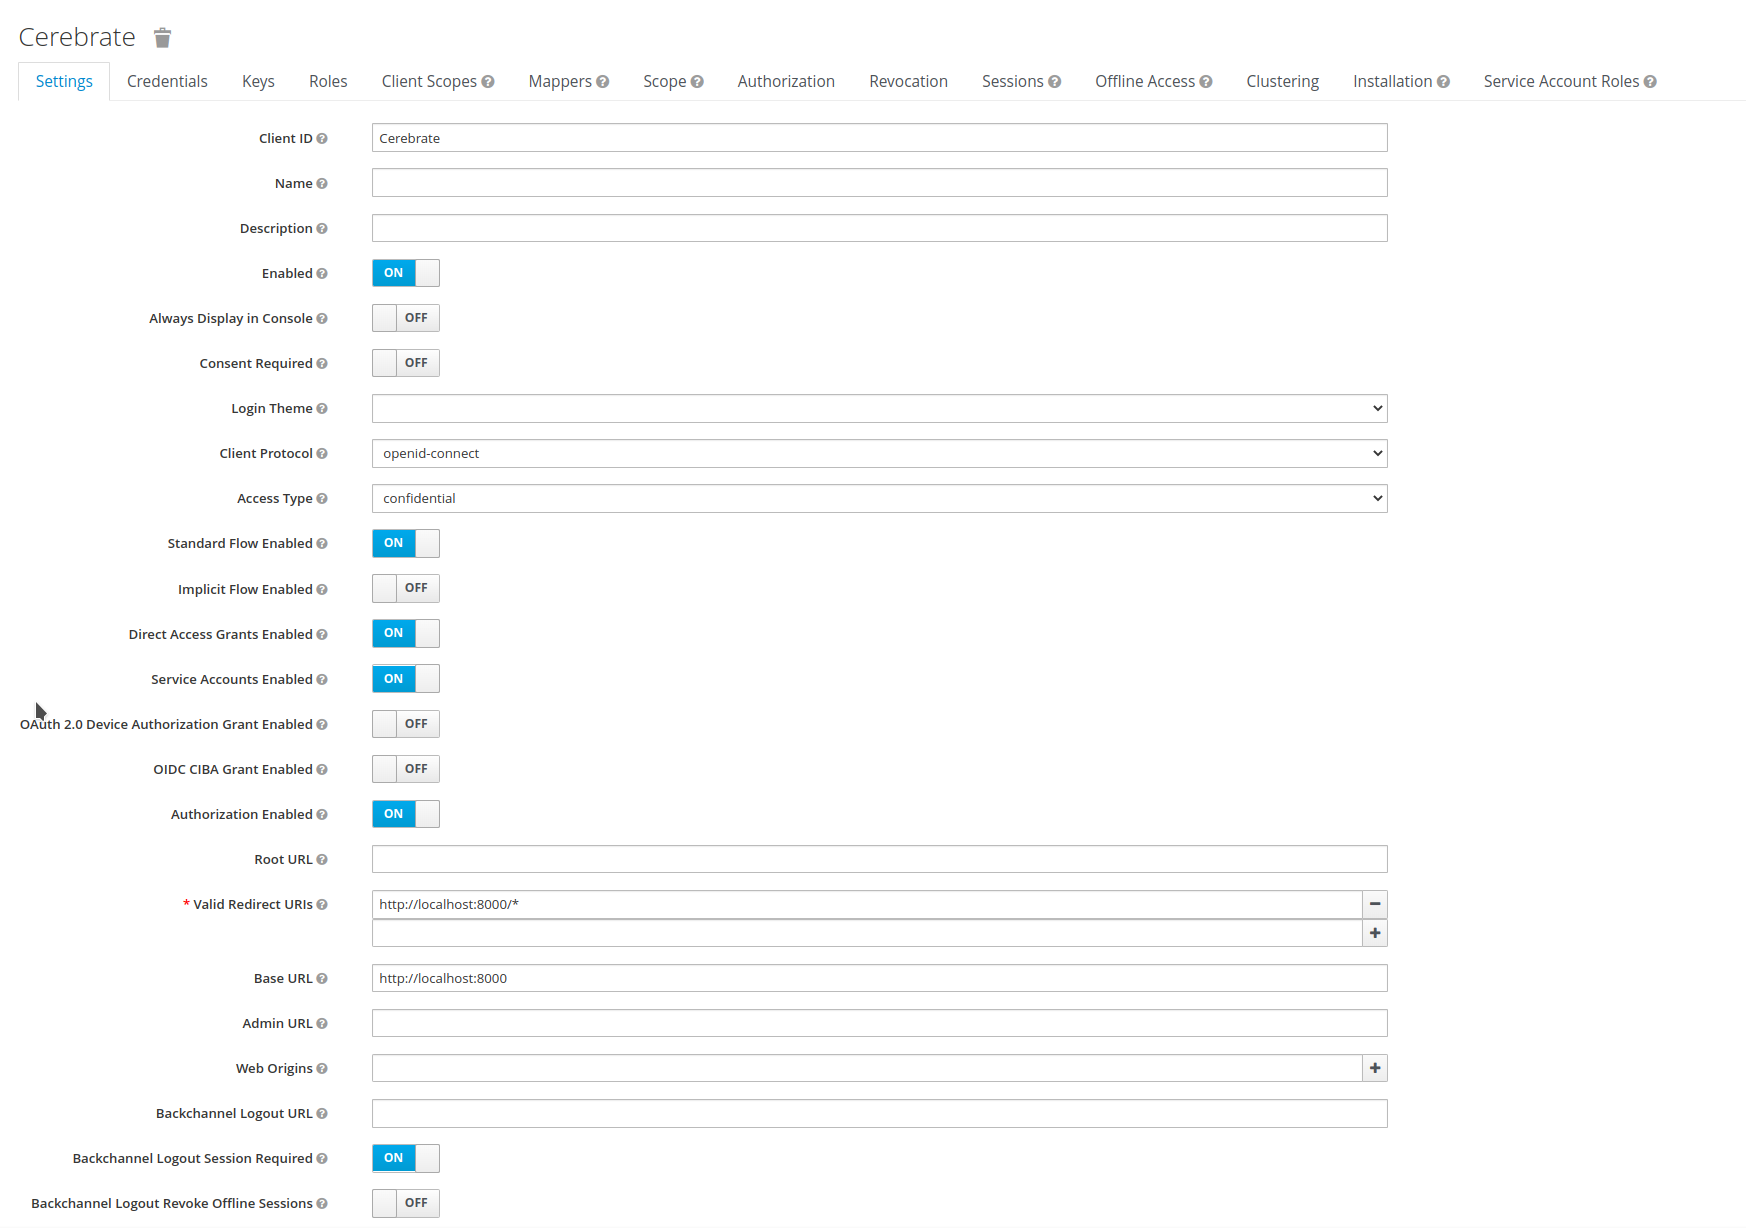
Add a Cerebrate client to your realm such as below
- The Realm and Client name do not have to match as in the screenshots
- The Client ID will need to be encoded as the Client ID in Cerebrate's keycloak configuration
- Service accounts, Authorization and Direct Access Grants need to be enabled
-
Redirect URIs and the Base URL need to point to Cerebrate's baseurl as listed below (Valid redirect URIs are
https://path.to.your.cerebrate/*whilst the base url ishttps://path.to.your.cerebrate)-
in Keycloak "old admin" UI (<21):
-
in Keycloak "new admin" UI (>21):

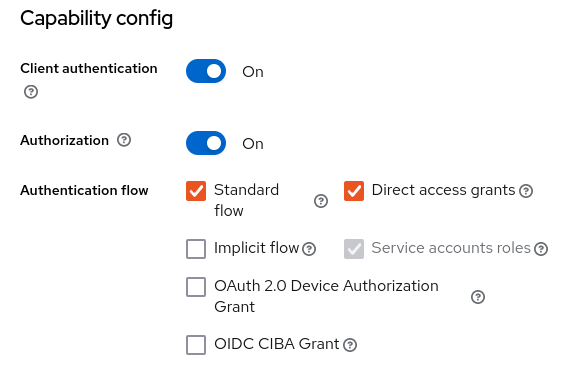
-
-
Once the Client is added, some additional configurations have to be undertaken:
- Under the Credentials section:
- set client authenticator to
Cliend Id and Secret - Generate a secret - this is to be encoded in cerebrate as the
Client Secret
- set client authenticator to
-
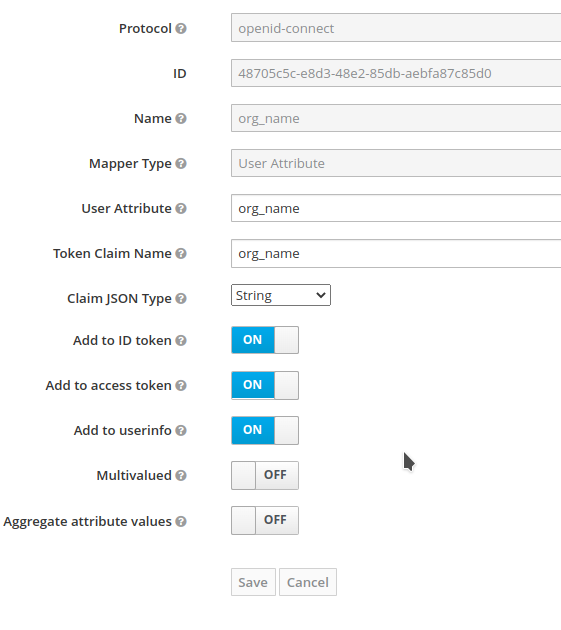
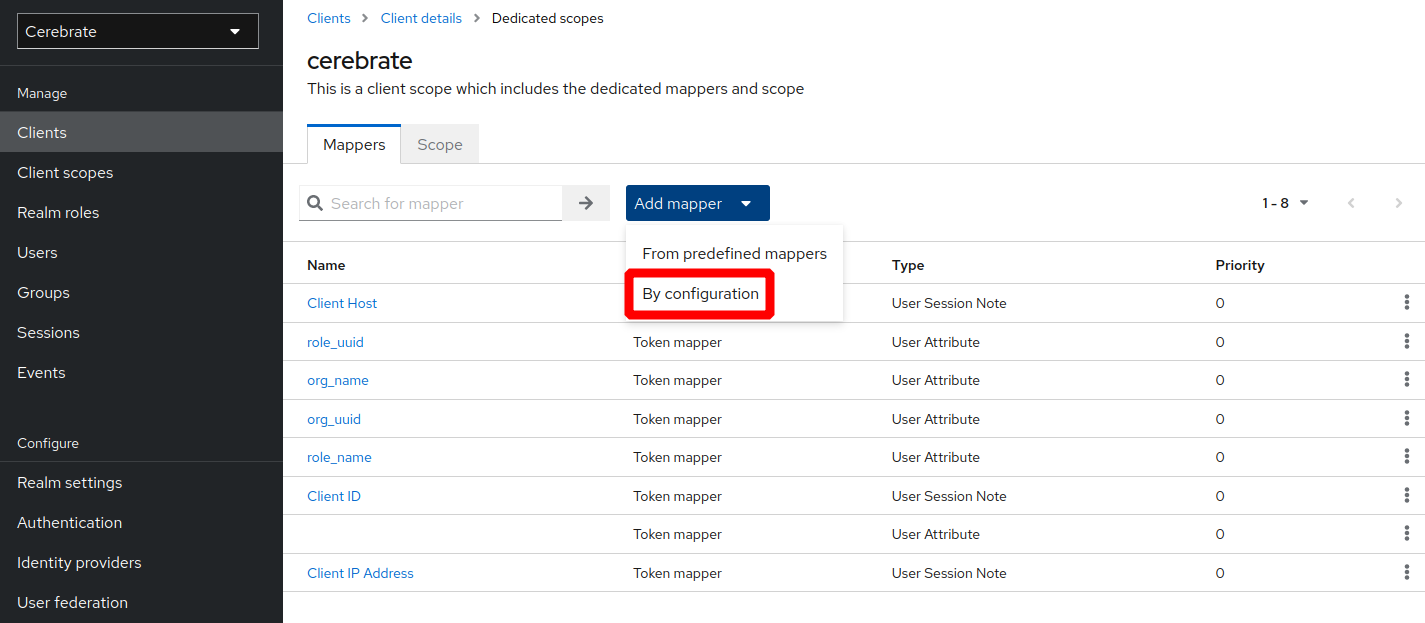
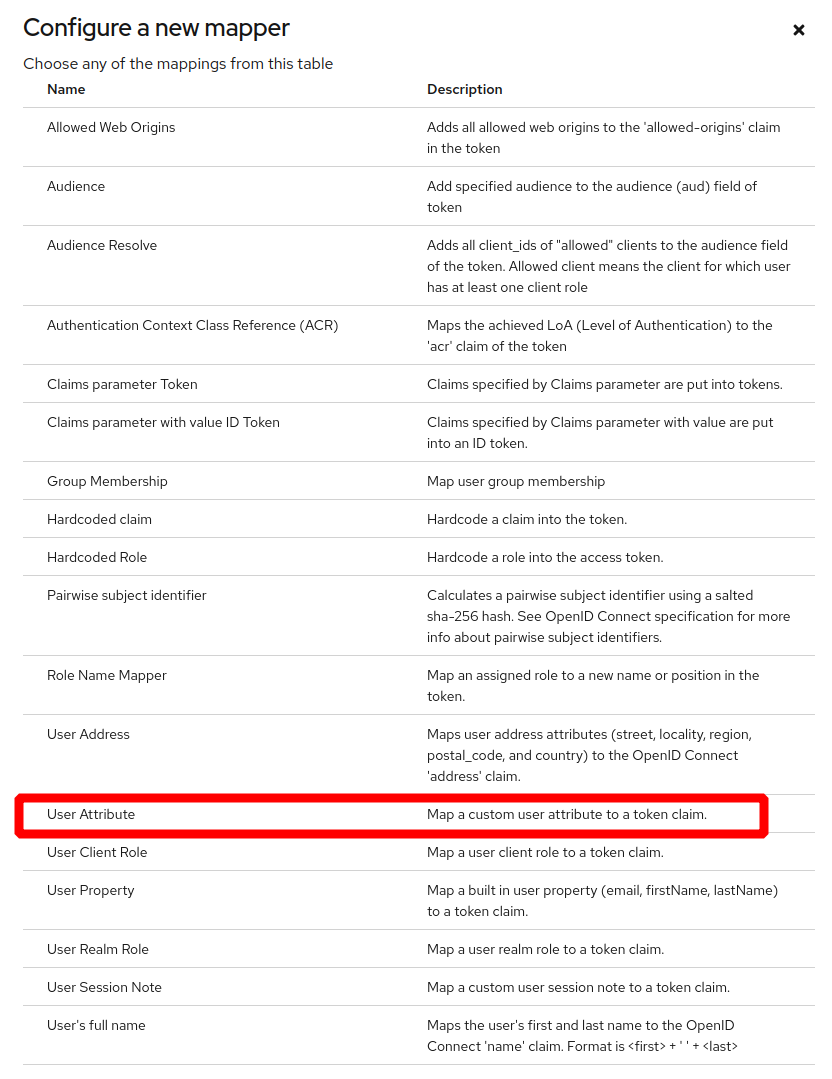
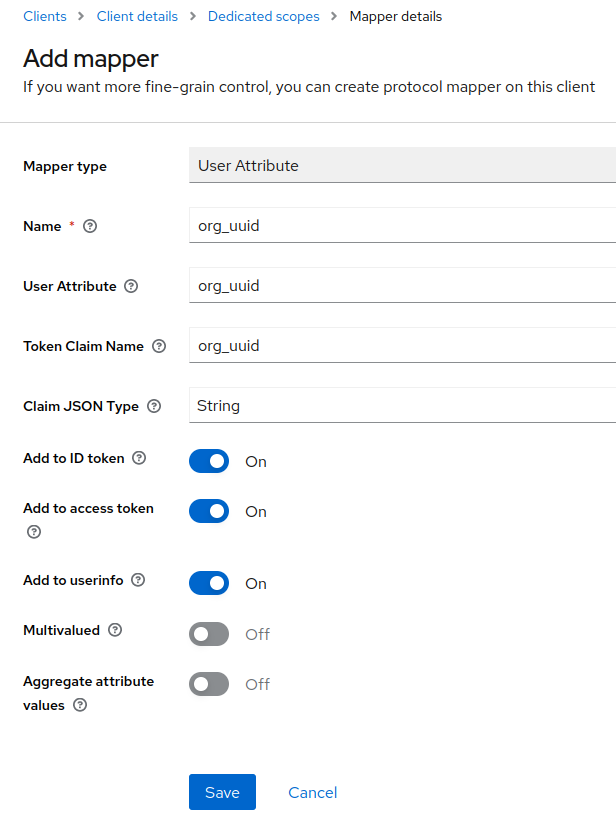
Under the Mappers section, add the following mappings:
- org_name, org_uuid, role_name, role_uuid
-
make sure that all of the mappins look as the screenshot below:
-
in Keycloak "old admin" UI (<21):
-
in Keycloak "new admin" UI (>21):
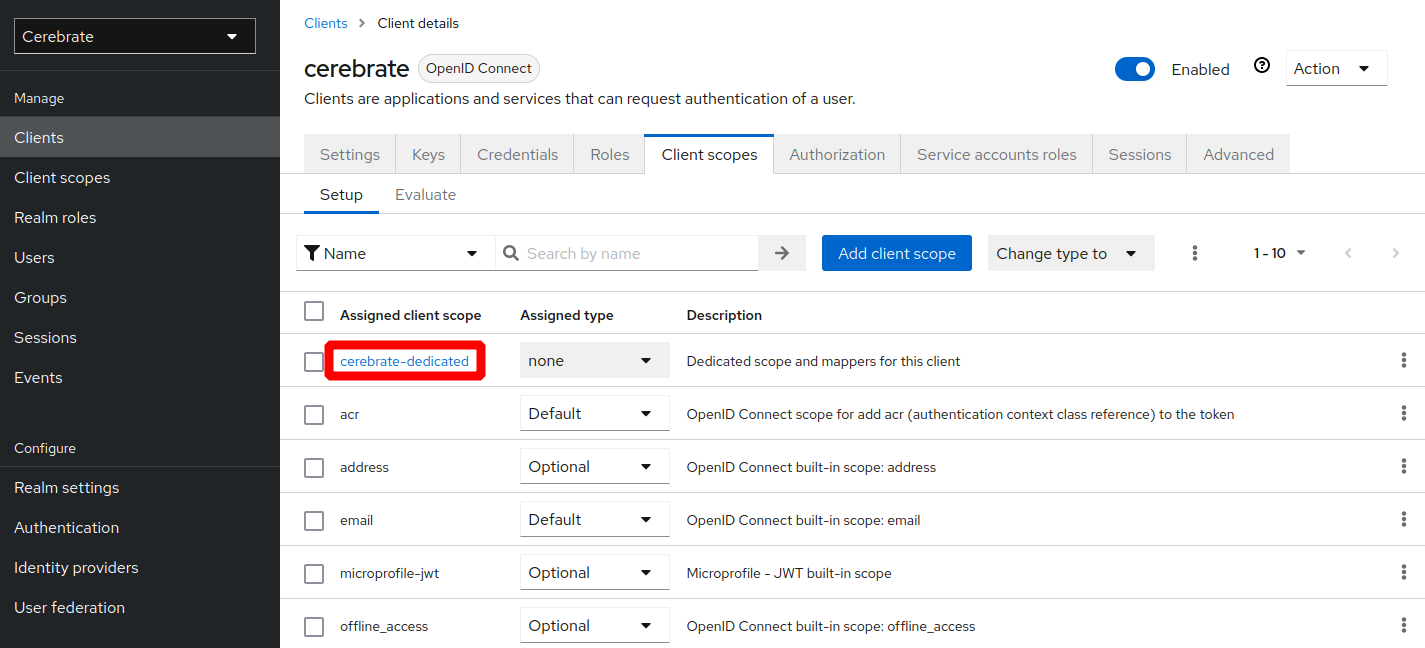
-
-
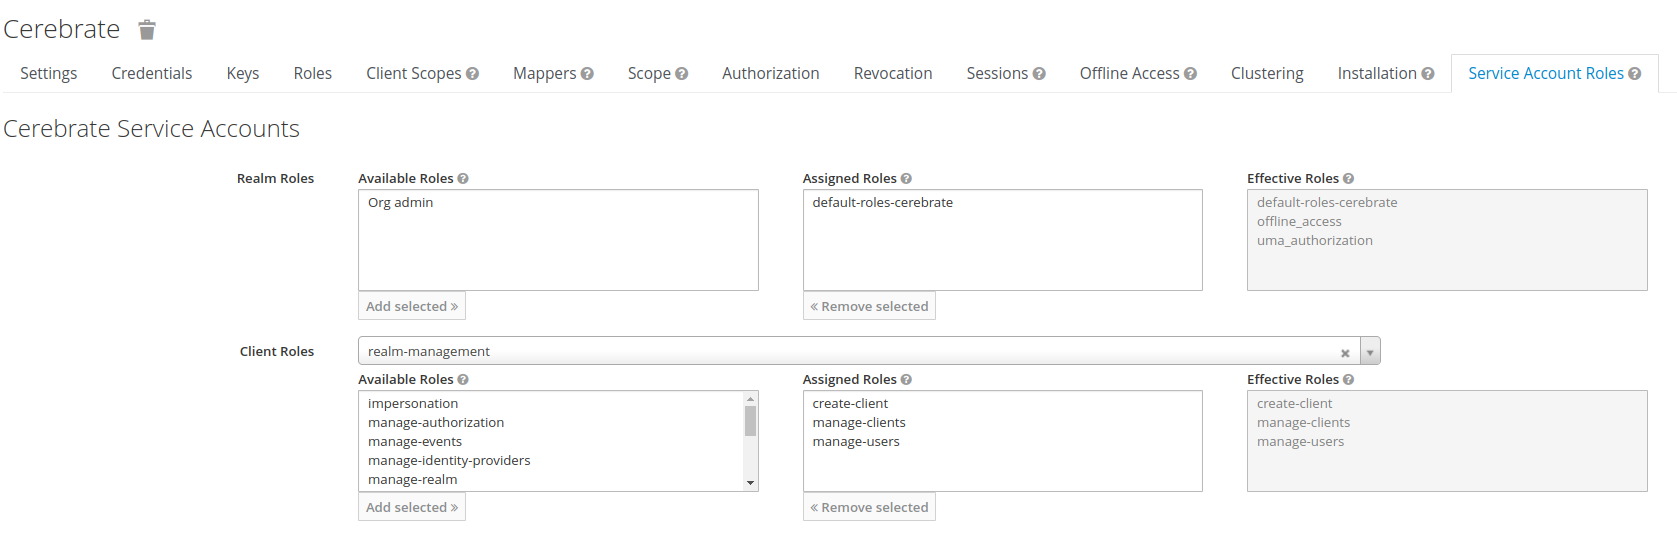
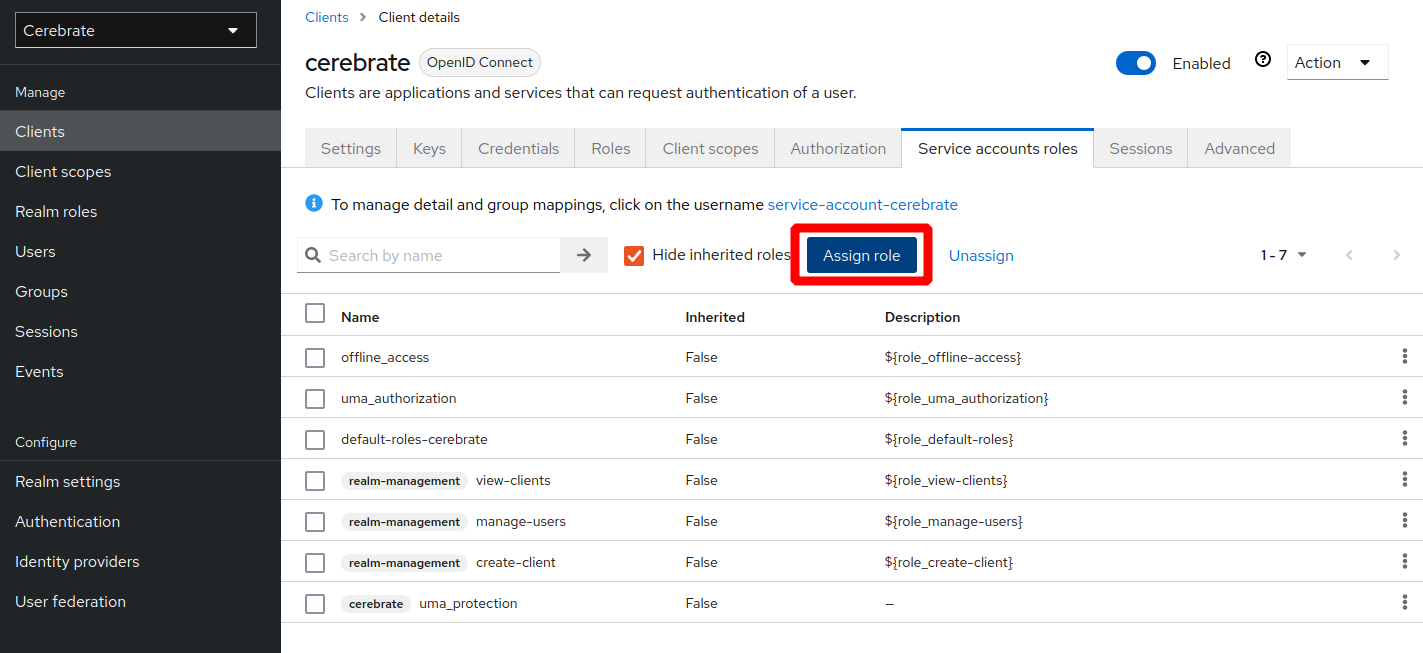
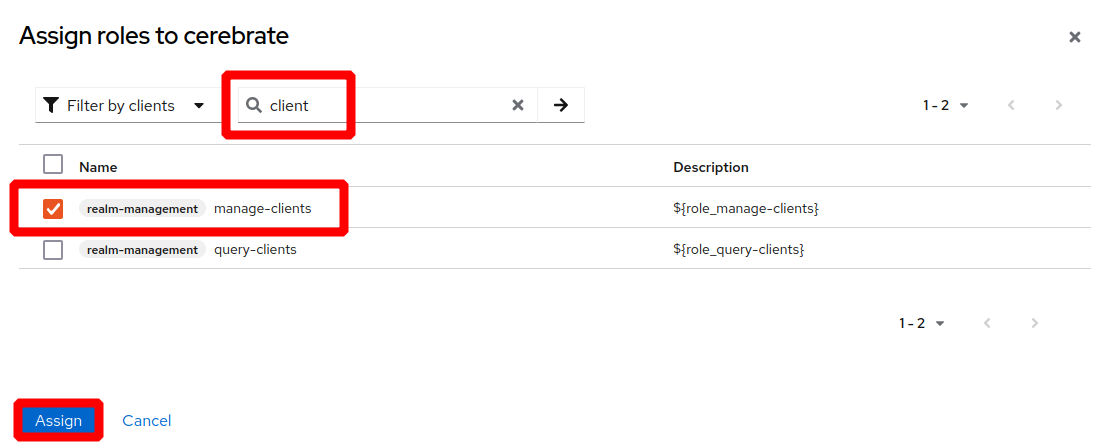
Under Service Account Roles:
-
Make sure that under the "realm management" Client roles the following are enabled:
- create-client
- manage-clients
-
manage-users
-
in Keycloak "old admin" UI (<21):
-
in Keycloak "new admin" UI (>21):

-
- Under the Credentials section:
Keycloak version > 22
Start keycloak with the following flag for a smooth logout:
--spi-login-protocol-openid-connect-legacy-logout-redirect-uri=true
Cerebrate configuration
Settings
The relevant settings can be accessed via Instance -> Settings -> Authentication
The relevant settings are shown below:
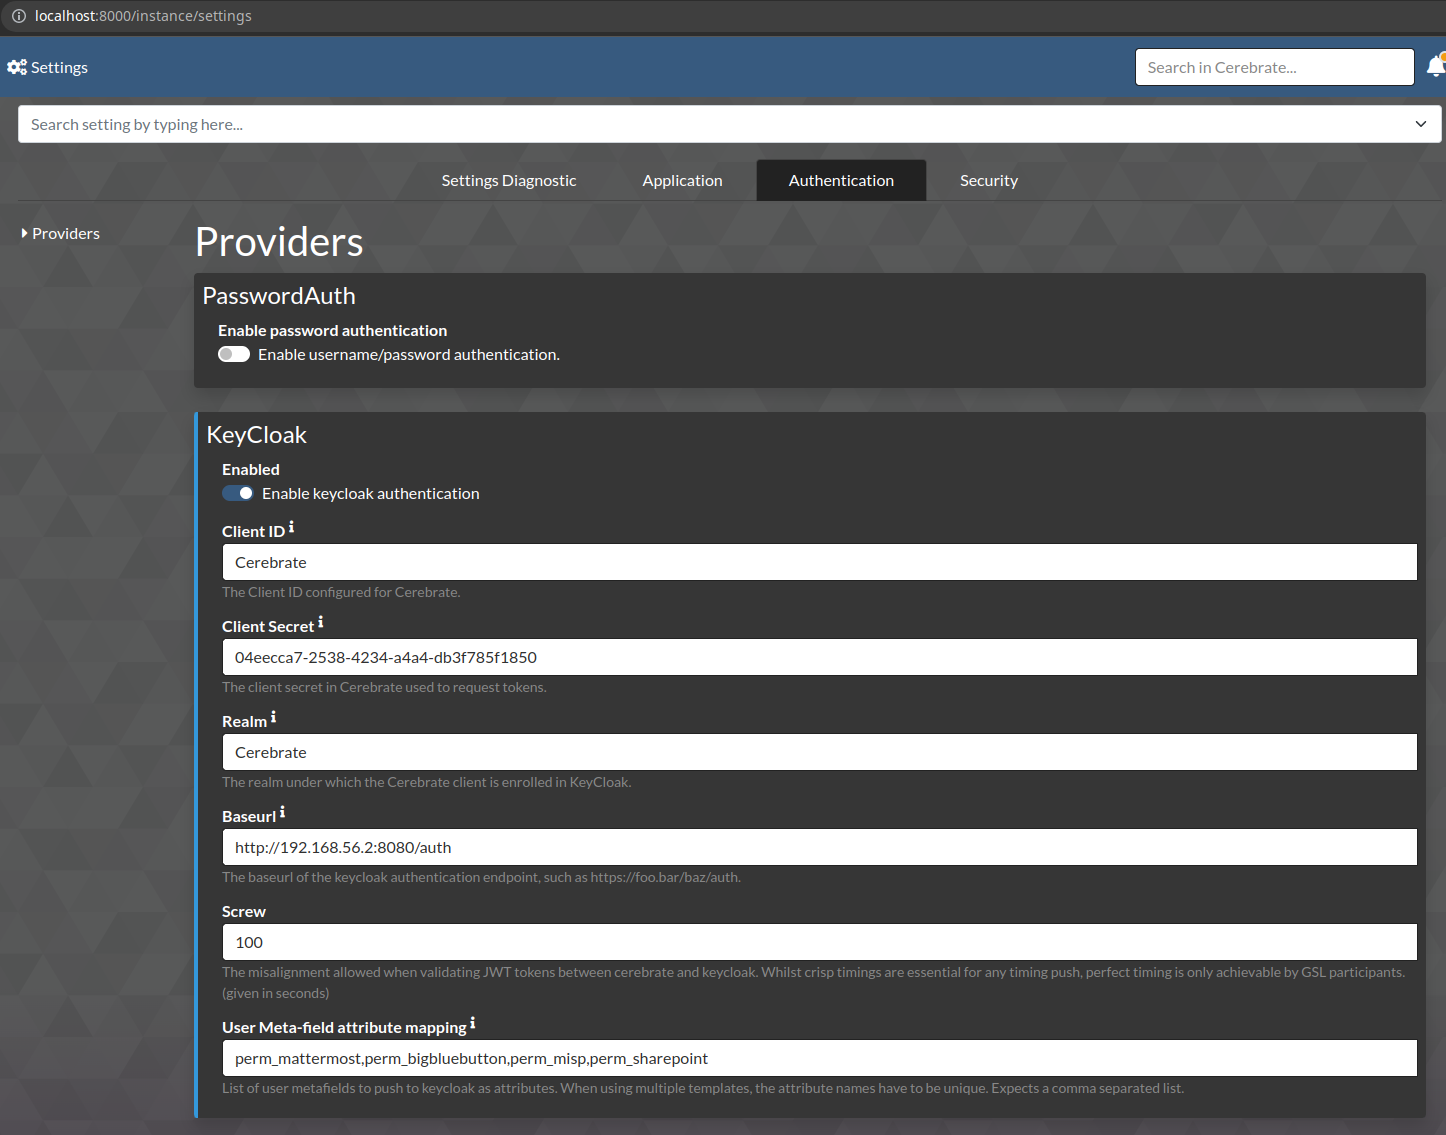
- PasswordAuth can be disabled to disallow any username/password authentications with Cerebrate directly and to rely fully on keycloak's authentication service.
- Once enabling Keycloak as an authentication provider, ensure that the configuration in the KeyCloak provider settings matches what you have configured in KeyCloak
- Some additional notes:
- Screw allows for a bit of slack when it comes to timing differences between the KeyCloak server and the Cerebrate server. The default configuration of Cerebrate is to have a ms accurate match between the token and the client, which can block authentication in case of no ntp updates (due to whatever reason). Allowing for a bit of slack should avoid this potential issue.
- User Meta-field attribute mappings allow for additional user permissions to be propagated as user attributes to keycloak. This means that other tools authenticating with keycloak have the possibility to allow/disallow access based on Cerebrate controlled settings. For more information on how to create meta-templates, see the User permission meta-template section. The data has to be stricly entered as a comma separated list.
- Make sure that the Baseurl points to the authentication root of KeyCloak, which by default is
/auth.
Synchronisation script
Whilst Cerebrate will attempt to propagate any changes to users (creation/update/disabling) directly to KeyCloak when they are modified, in case of network outages, downtimes, manual modifications on KC's side or other errors, the two databases might drift apart and introduce discrepancies.
- To remedy this, Cerebrate includes a synchonisation script that can be invoked via the CLI. The intention of this script is to be executed periodically via Crontab.
- The script can be invoked via (assuming the default install path):
- /var/www/cerebrate/bin/cake KeycloakSync
- To add it to crontab follow the following command instructions:
- Enter crontab as your cerebrate user (typically your apache user such as www-data):
sudo crontab -u www-data -e - Add an entry for the synchronisation script:
- */15 * * * * /var/www/cerebrate/bin/cake KeycloakSync >/dev/null 2>&1
- The above will execute the script every 15 minutes.
- For more details on configuring crontab, rely on the cron documentation
- Enter crontab as your cerebrate user (typically your apache user such as www-data):
Administering users in Cerebrate
Key concepts
flowchart
    U[User] -->|has a| R[Role]
    U-->|belongs to| O[Organisation]
    U -->|is described by| I[Individual]
    R -.->|controls| F[Accessible Features]
    O -.->|controls| D[Accessible Data]
    I -.->|describes| P[Natural Person]
    U --> |owns one or many| AK[Authentication Keys]
    AK -.->|allows for| API[API access]
    U --> |owns one or many| EK[Encryption Keys]
EK -.->|allows for| ENC[Signing/Validation/Encryption]- Users in Cerebrate purely deal with the access control and user permissions. In order to create a User we actually need to encode a User/Individual/Role/Organisation tuple. Whilst this may sound daunting at first, it's a rather straight forward process. Let's have a look at each of the moving parts involved:
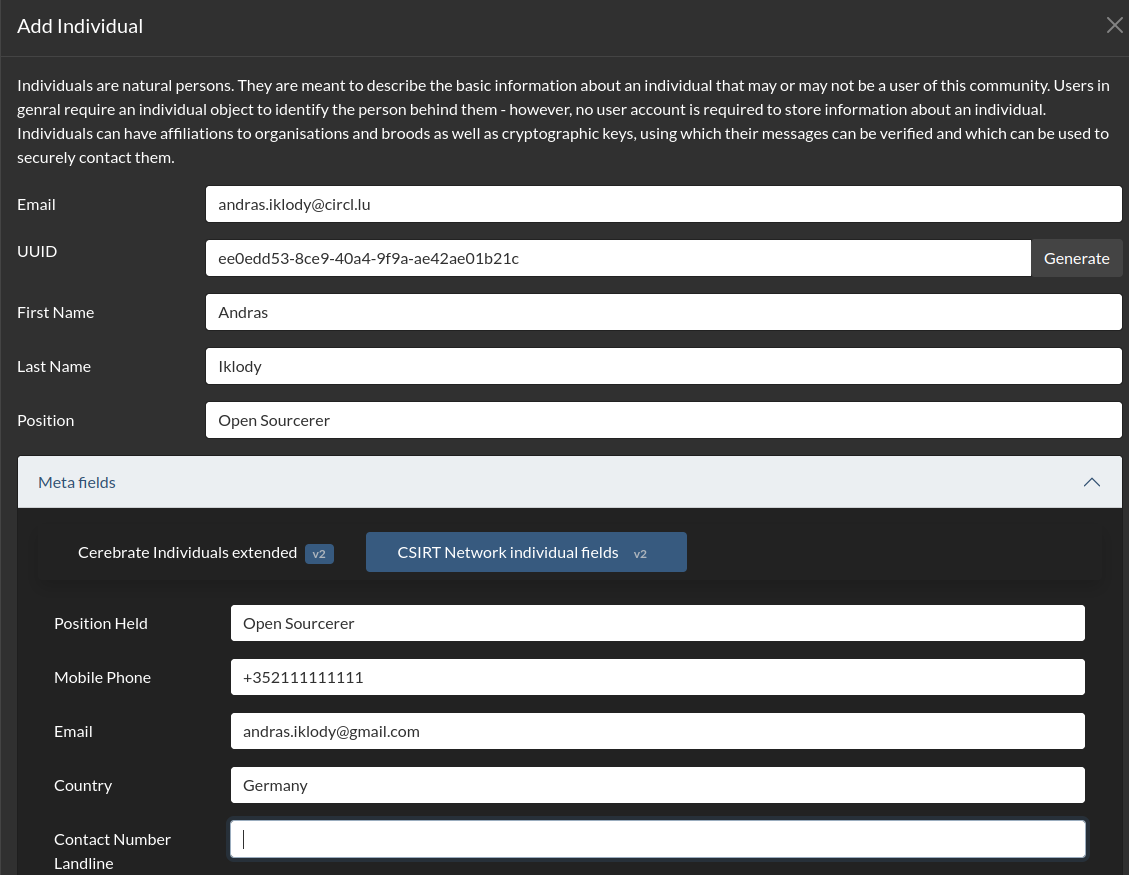
Individuals
- Every User is tied to a Cerebrate Individual
- Individuals are Contact database elements housing meta-information about a natural person, such as their name, e-mail address, etc
- Individuals can be created individually without the intent to attach a User to them. In this case they remain purely information data objects.
- If you wish to create an Individual to be used as a User, you can start by adding an Individual or create it in one-shot together with the User from the User add interface.
- Whilst creating/modifying Users, you'll have access to a small set of fixed fields as well as a set of custom defined meta-fields that are derived from meta-templates. These are optional, but powerful searchable / automatable data fields.
Users
- Every User belongs to an Organisation
- Cerebrate Organisations describe either legal organisations or virtual organisations
- Data is owned by Organisations in Cerebrate, meaning that access control to sharing groups, organisation administrative data is restricted within the organisation boundaries
- You can either directly create a new individual or associate a user to be created with an existing one.
- Control additional permissions to other tools managed by Keycloak via the CNW permission meta-template
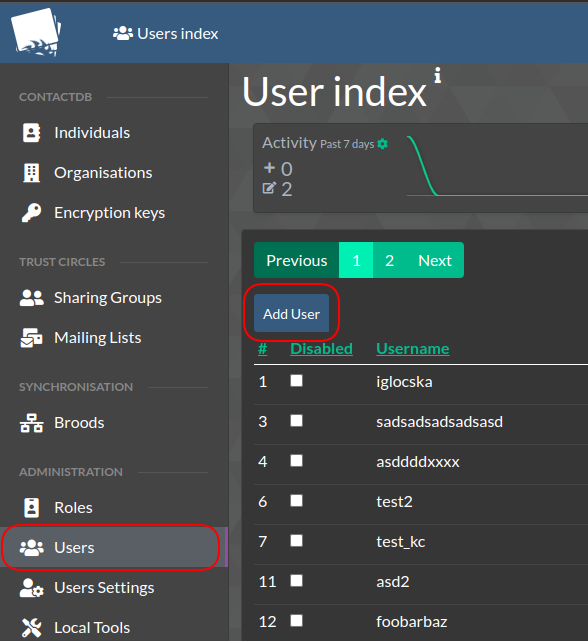
Enrolling users
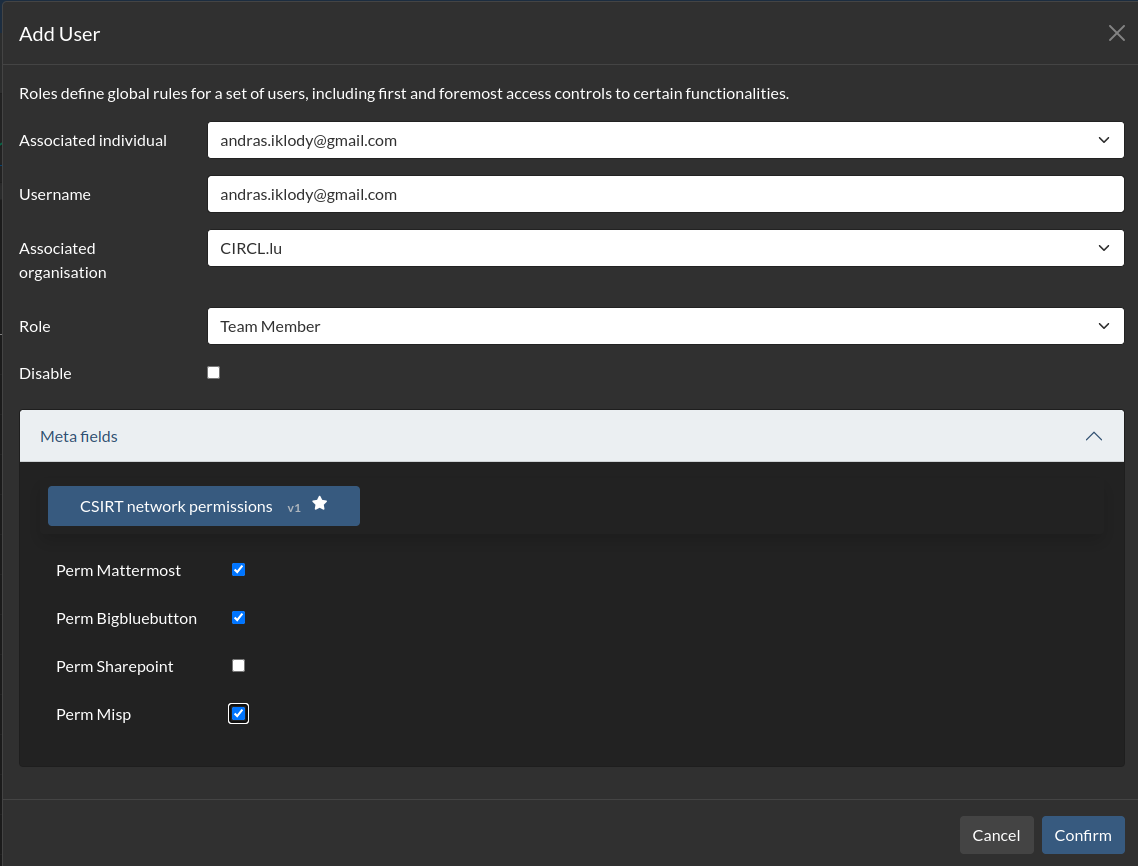
- To enroll a User, simply navigate Users -> Add User
- Then fill out the User add form as described above
- If the Individual is not yet created, create a new one directly from this form
- Make sure that you choose the correct Organisation and Role associated with the new User - if either of these do not exist yet, make sure you create them using the Organisation or Role creation forms first.
- As a best practice recommendation, using the same username as the individual's email address is recommended
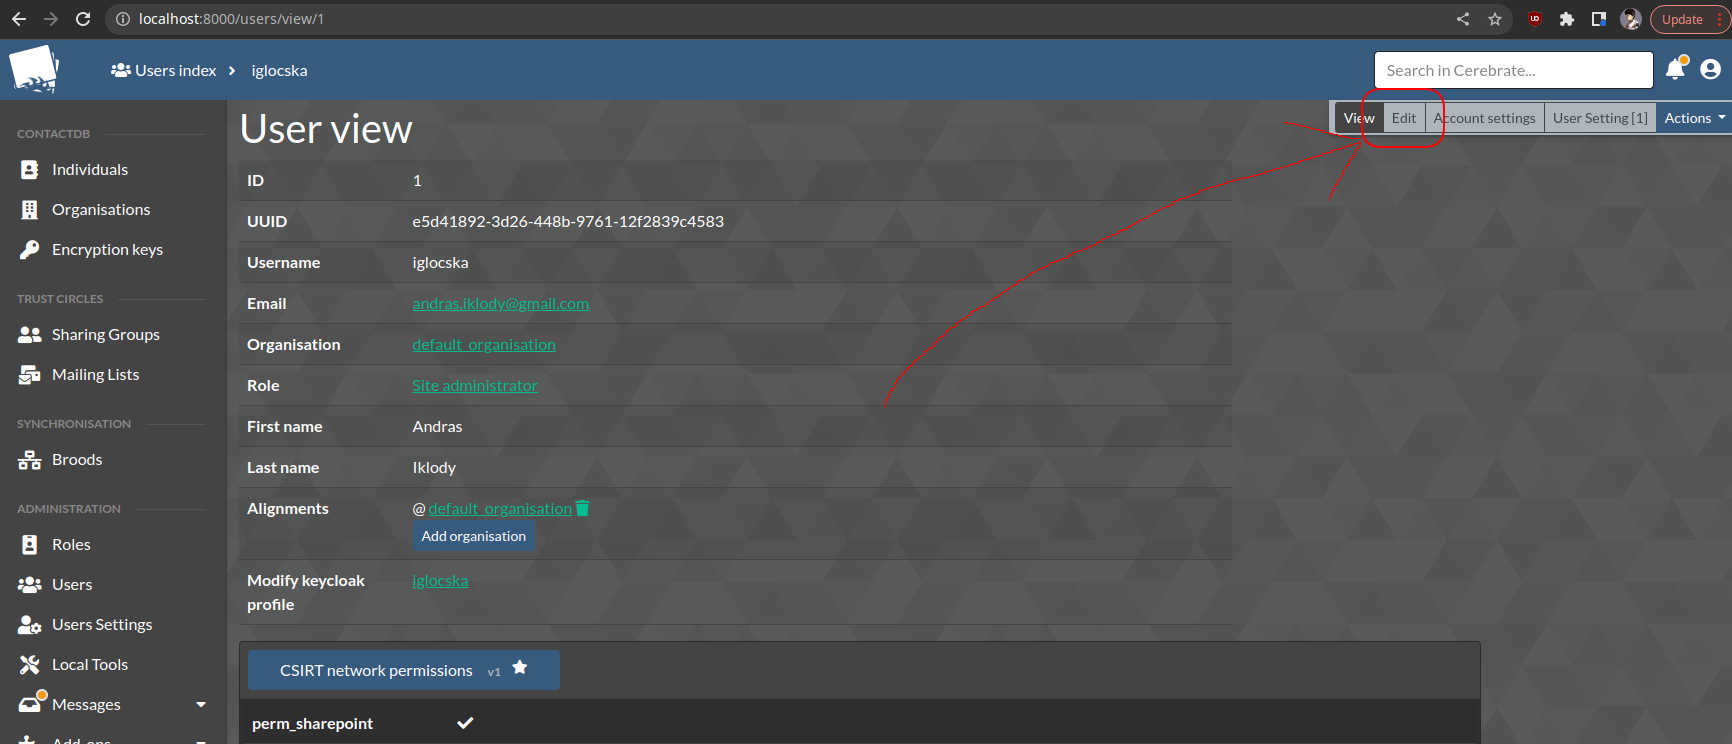
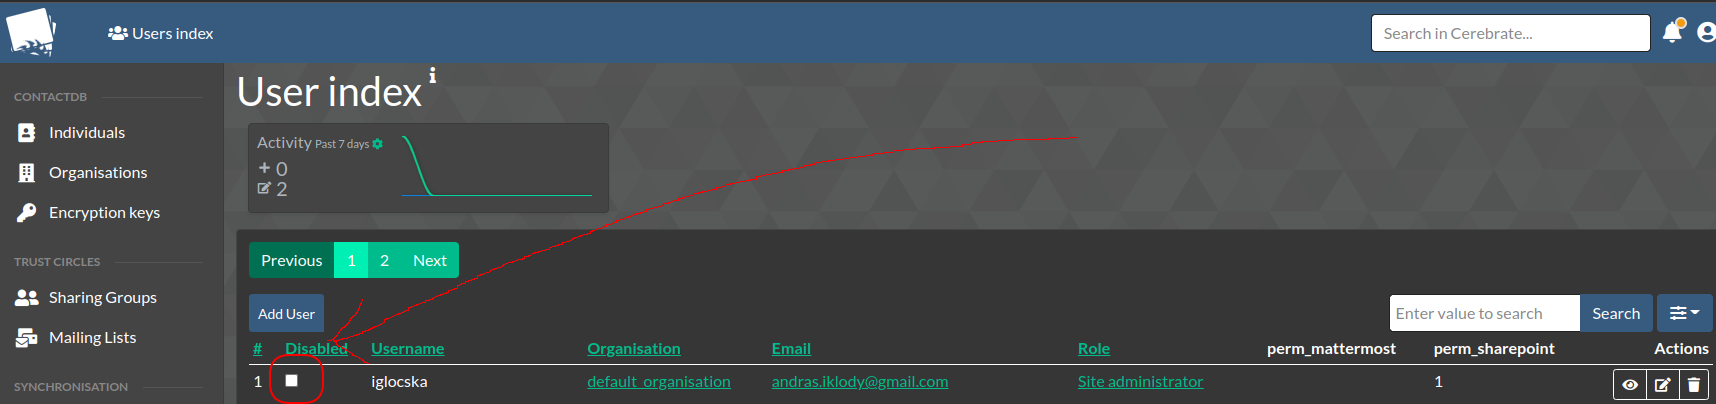
- If you wish to update a User simply use the edit action button on the right side of the User index, or the Edit quicklink button on the User view.

- It is never recommended to delete as User - rather always disable them. This is great for auditability. To disable a User, simply click the disabled checkbox in the User index.
- Users have authentication information attached to them, in the form of a password (disabled when in KeyCloak only mode) and API keys
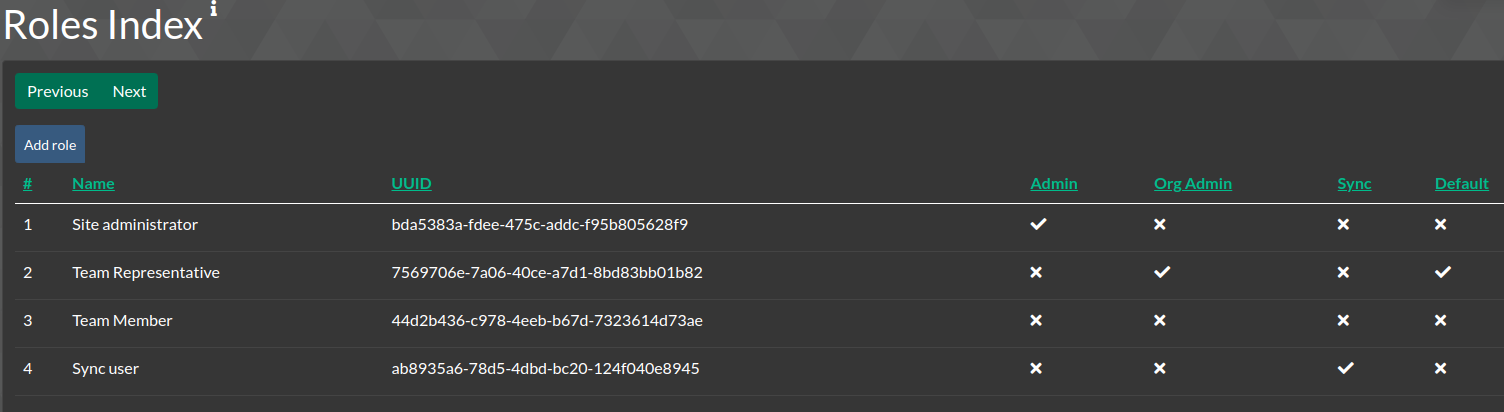
Roles
- Cerebrate comes with a set of default roles, however we'll focus on the CNW specific roles below
- Site administrators are users with a special role attached, they transcend the above restrictions. Whilst they do belong to an organisation, they can administer any organisations' data. Only site administrators can encode interconnections with other Cerebrate nodes, modify instance configurations, and add elevated privilege users (Team representatives, Team secondaries, Sync users)
- Team representatives are the equivalent of Cerebrate Org administrators, they are regular users with some limited administrative powers in order to be able to enroll users in their own organisation, manage users in their team as well as their meta information and have limited auditing capabilities for their team members.
- Team secondaries are alternates to the team representatives and functionally carry the same powers.
- Team members can interact with the system, access data restricted to their team but have no administrative powers.
- Sync users are special users that can convey information between Cerebrate nodes. They come with elevated privileges in that they can modify data on behalf of other organisations.
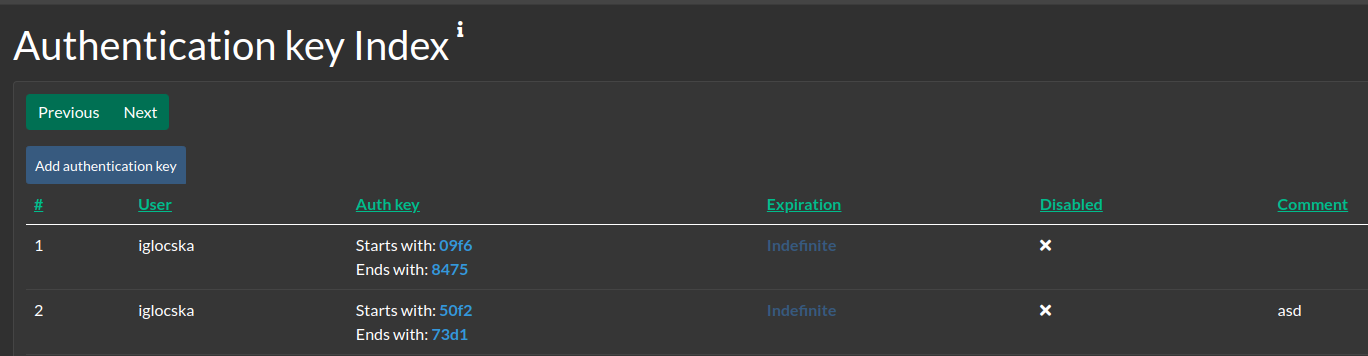
Authentication keys
- Are keys that can be created by Users for their own use
- They can be disabled when no longer in use. This is encouraged rather than removing them for auditability.
- Can be configured to expire on a given date
- Can and are encouraged to be commented for auditability. Creating individual keys for different integrations is considered best practice.
- Authentication keys, once created, cannot be retrieved again, so make sure that you note down the key when they are created.
- The first and last 4 characters are kept and displayed for easier identification.
Cerebrate to Cerebrate synchronisation
- A Cerebrate with its eco-system (connected local tools, communities, etc) are called a Brood in Cerebrate
-
Broods can interact with one-another via two exchange layers:
- Cerebrate to Cerebrate synchronisation
- Local tool to Local tool native exchanges
- For example MISP to MISP synchronisation
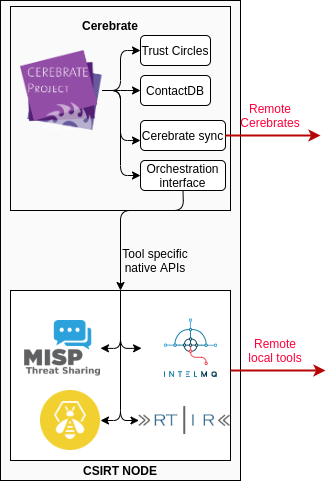
- For example MISP to MISP synchronisation
-
** Adding a Brood is as simple as asking a partner to create a sync user for us on their Cerebrate instance and us doing the reverse for them.
- Refer to the User section above to see how to create a user. Make sure that the User belongs to the Organisation that reflects the owner of the cerebrate node to be connected.
- Make sure that the Role of the user is configured to be a Sync User
- Either create an Authentication key for the partner Cerebrate's synchronisation user and send it to them, or alternatively let them log into your instance via their sync user that you have created for them directly and create an Authentication key for themselves
- Once the API keys are exchanged, encode the Brood
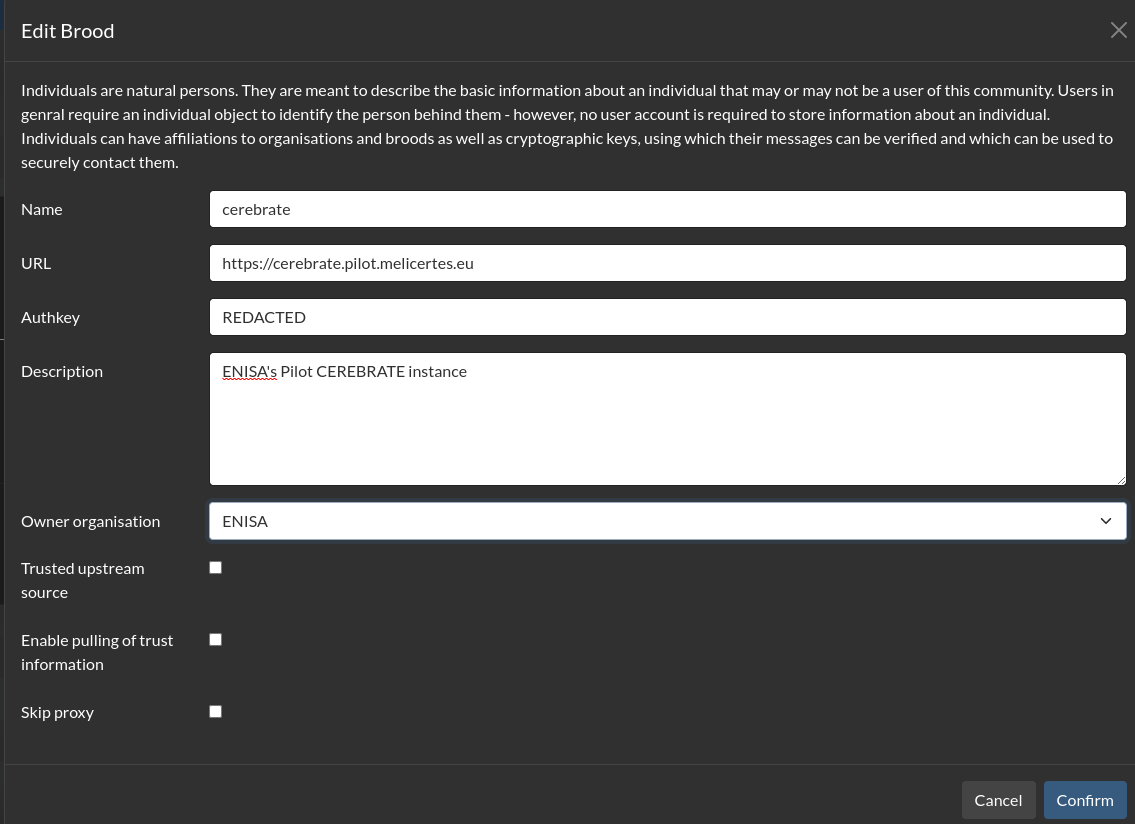
- To validate the connection, run the connection test

- The above guide describes a 2-way synchronisation exchange, with that said 1-way exchanges are also possible where only one party receives an API key from the other and encodes a brood.
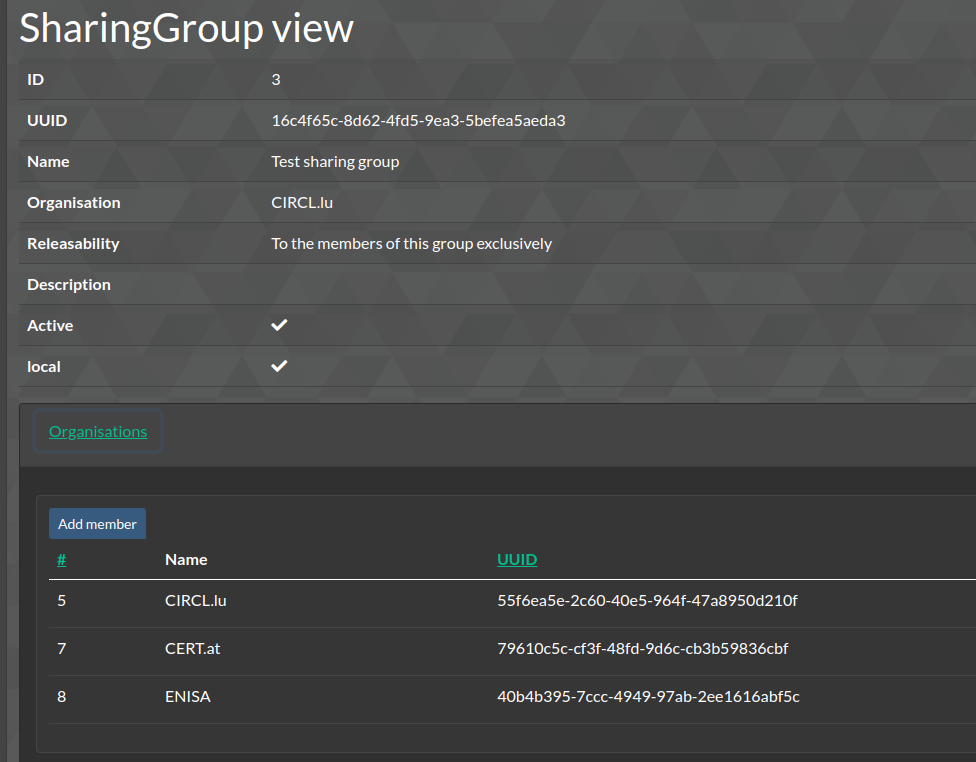
Sharing groups
- Sharing groups are containers for lists of organisations, to be used for granular information exchange via local tools.
- For example, a sharing group pushed to MISP can be used to create data for the CNW community only, or for subgroups thereof.
- For more details on Sharing groups refer to the MISP documentation.
Audit logs
- All actions that result in data creation or modification as well as authentication issues or encountered bugs end up in the various logging systems of Cerebrate
- The build in Audit logs provide a searchable structured logging interface for all essential logs
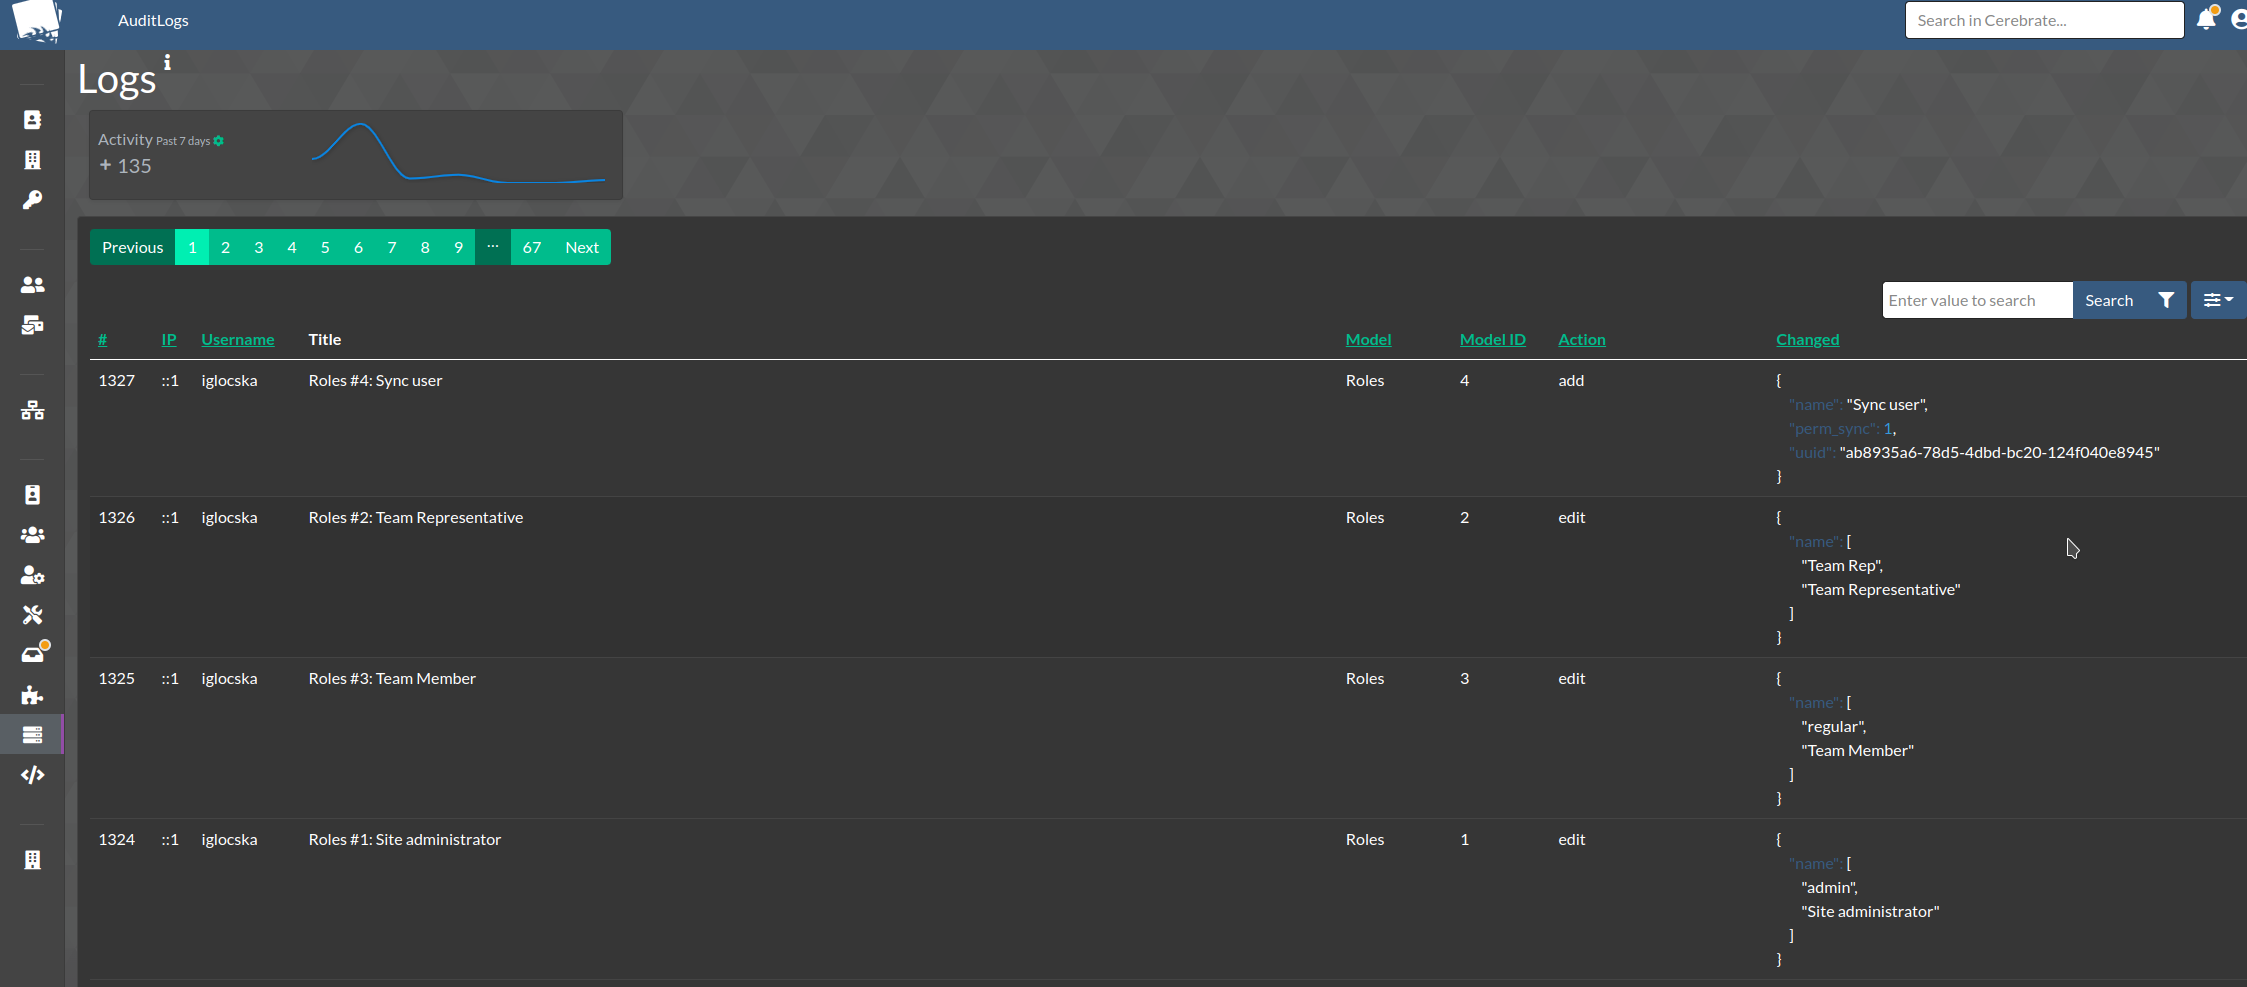
- These logs are also API exposed and can be searched as part of automatic remediation efforts
- The build in Audit logs provide a searchable structured logging interface for all essential logs
- Error logs, debug output and stack traces are stored in the /var/www/cerebrate/logs directory
Enforcing tooling permission limits
- In some cases, enforcing additional limitations on the community, such as the number of allowed users in Mattermost, also are desired by communities with limited resources or accessed to under-provisioned services.
- To create such limitations, navigate to the Permission limitations interface (Instance -> Permission limitations)
- Add rules that restrict permissions based on their scope (global and organisation specific scopes)

- Add rules that restrict permissions based on their scope (global and organisation specific scopes)
- This will ensure that users cannot be created if the limits are not adhered to
Meta field templates
- Meta field templates allow for the extension of built in data-models (currently supported: Users, Individuals, Organisations).
- They are derived from JSON files found in
/var/www/cerebrate/libraries/default/meta_fields -
To add custom meta-femplates, simply drop a JSON document of the expected format in
/var/www/cerebrate/libraries/custom/meta_fields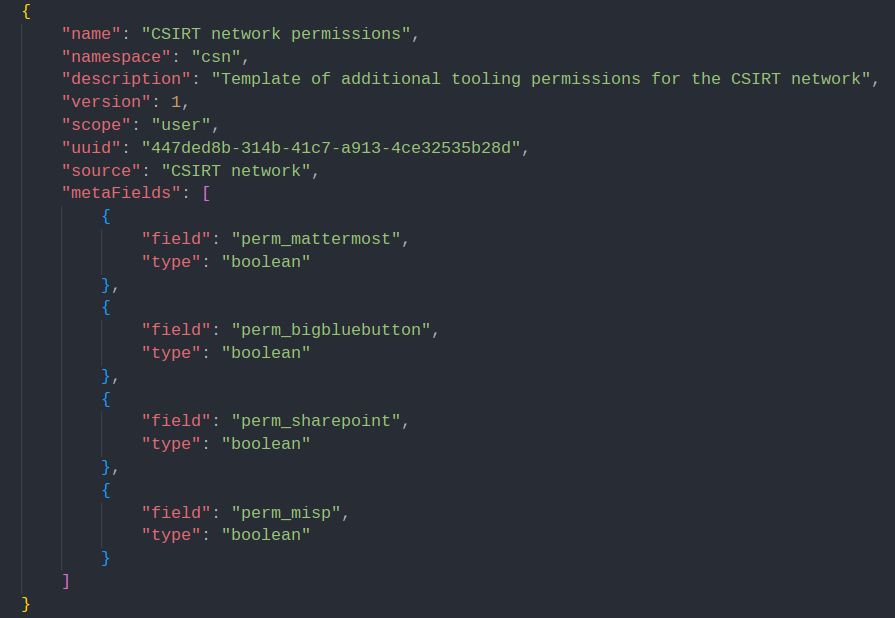
-
When creating a new meta-template make sure that the name is unique and the namespace consistent with your other meta-templates.
- Fields are added as key-values, simply add a new unique
field_name-typecombination. You can also optionally add theregexandmultiplefields. The former allows for custom validation scripts the latter for fields that allow multiple values. - Ensure that you use a unique UUID for each meta-template
- If you are updating and existing meta-template make sure that you increment the
versionfield. This is used by Cerebrate to deduce whether the given meta-template requires an update
Settings
- Cerebrate differentiates between two sets of settings
- User settings modify the look and feel and some base behaviours of the tool and are administered by individual users
- Instance settings are configured by administrators using the Instance -> settings menu
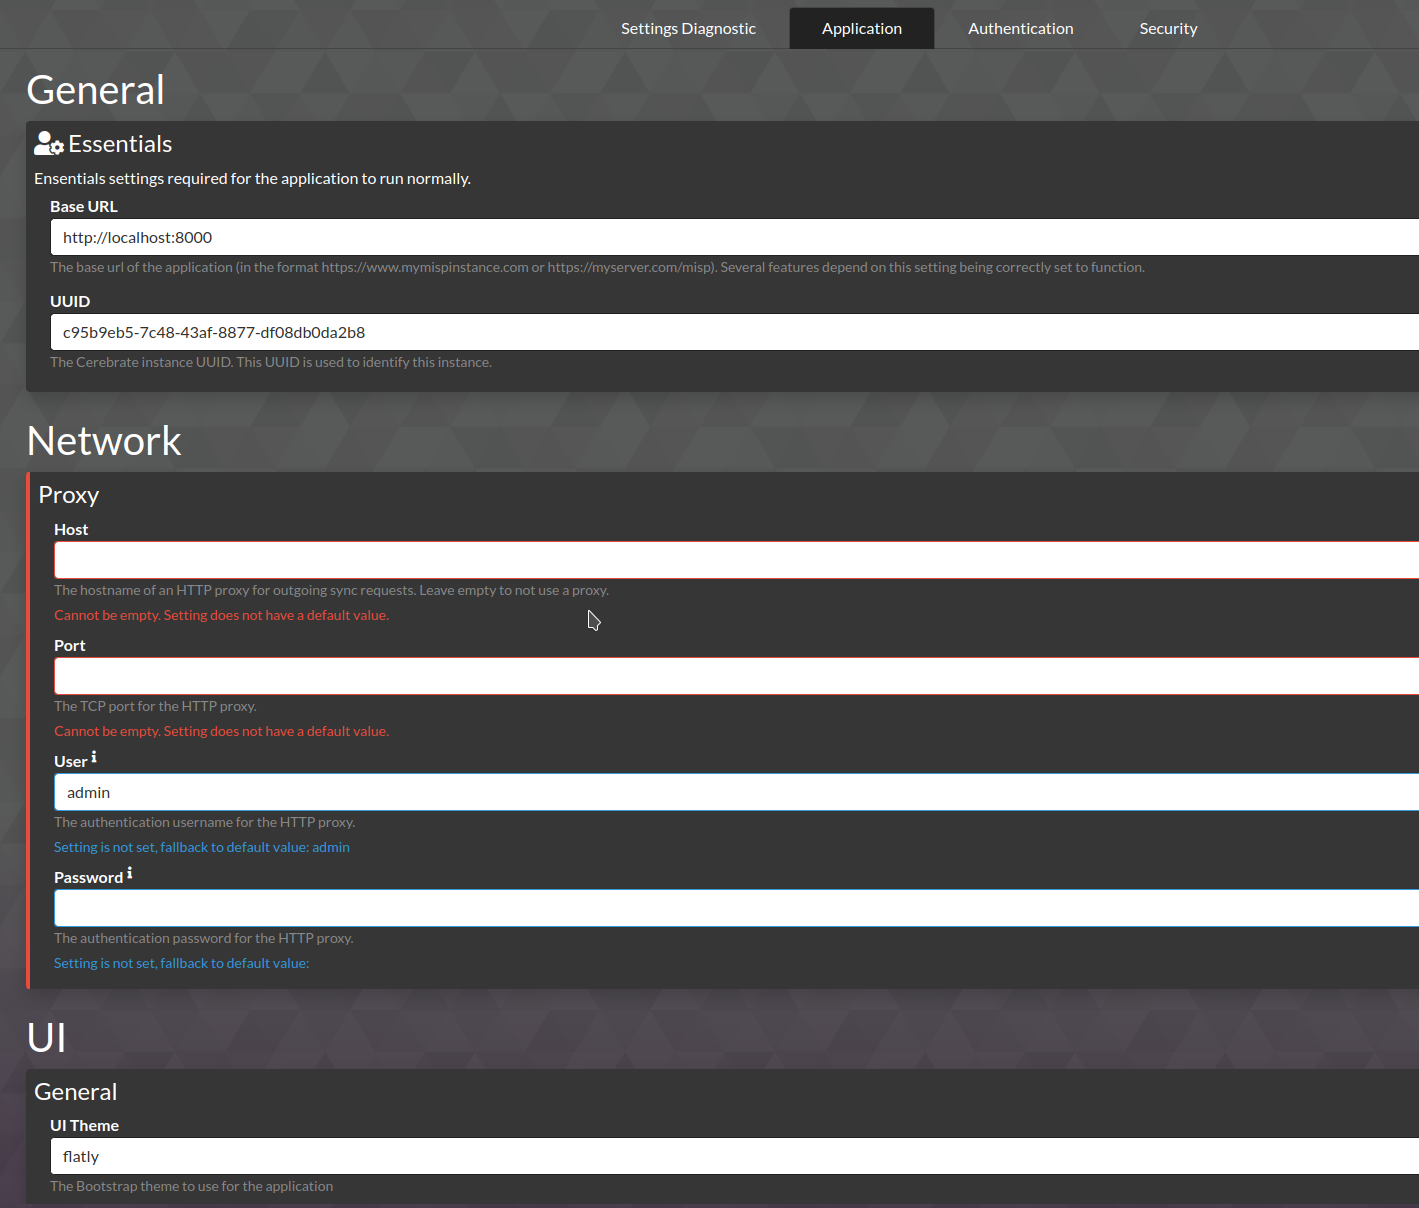
- Settings are validated and enforced by the system. Validation issues are displayed under the setting.
- Make sure that you check back to see if new settings have been added after each Cerebrate update
Updating Cerebrate
Updating Cerebrate is a simple process in most cases requiring you to follow the steps outlined below:
-
Update the code base
cd /var/www/cerebrateto step into the Cerebrate directorygit pull origin main && git submodule sync && git submodule update --init --recursiveto fetch the latest code-base and update submodulessu www-data -c "/var/www/cerebrate/composer update"to update the dependencies
-
Once done, log into Cerebrate and navigate to the database updates section (Instance -> Database)
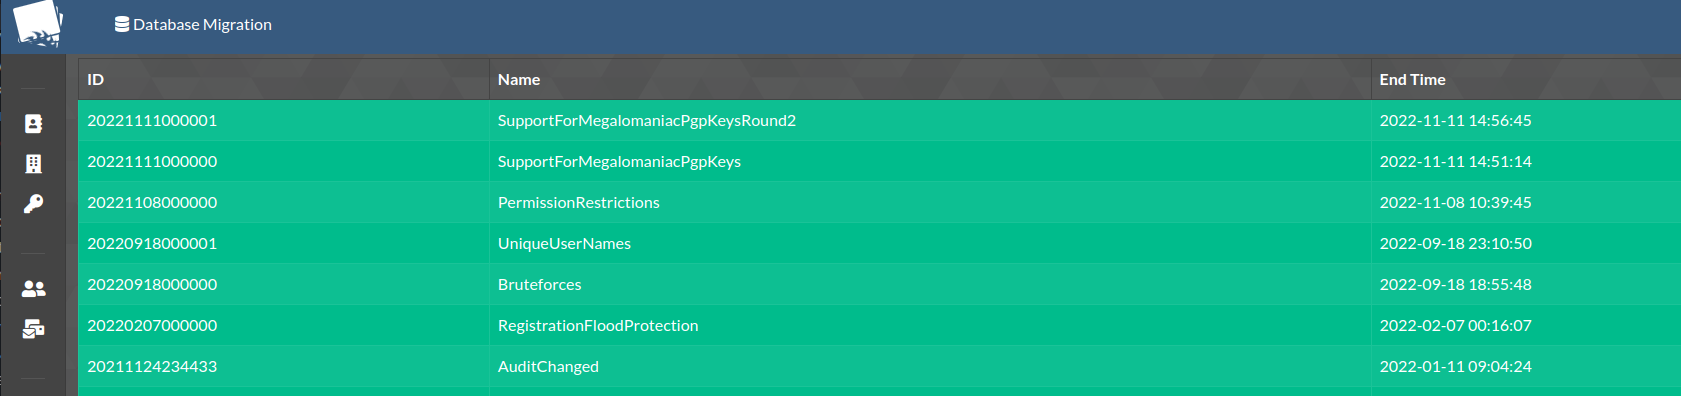
-
If you see pending updates, execute all
-
If anything goes wrong during the update, it will be noted in the Audit logs